

Project Overview
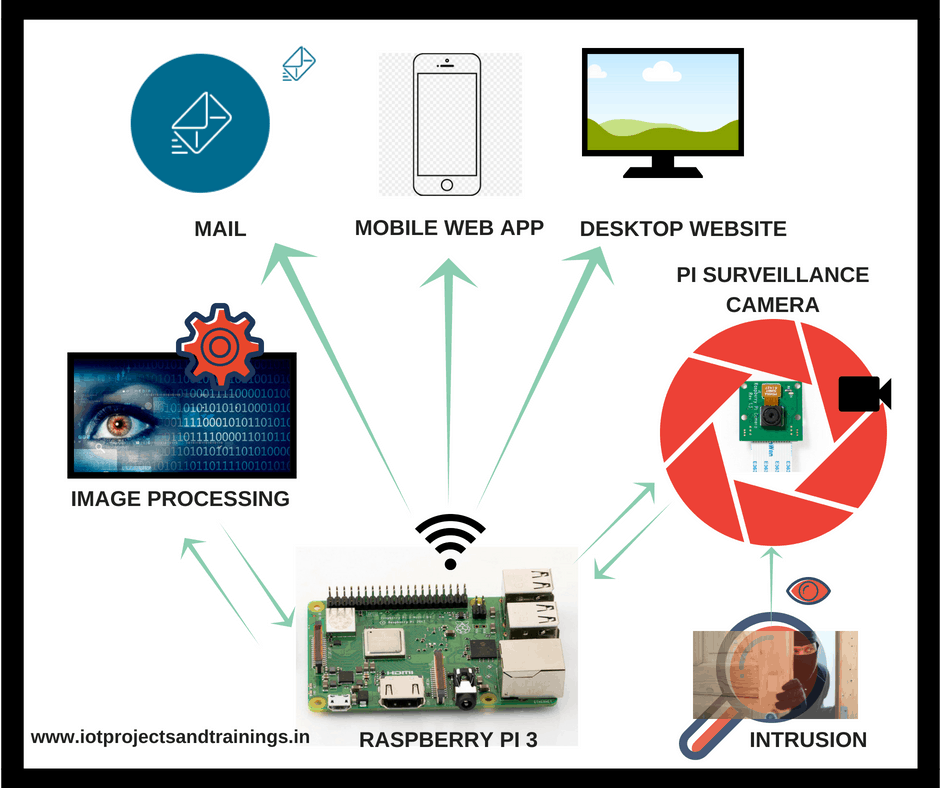
Hi Friends, today I would like to share a very interesting IOT project with you. It is titled ” How to make a Raspberry PI Security and Surveillance System- IoT Security”. In this project, you will learn how to build a motion detection camera that you will be able to use as a camera trap, a pet/baby monitor, a security camera, and much more. The best part of this project is that its remotely controlled via IOT and you also learn basic Image processing through it.
This is the 2nd Part of the project. Please explore 1st the Part of this project from
How to make a Raspberry PI Security and Surveillance System- IoT Security-PART 1
1st Part contains two sections :
- Section 1 -Image Capturing
- Section 2 – Micro-controller and Internet gateway
And this Second Part contains:
- Section 3 – Image Processing and Intrusion Detection
- Section 4 -Web Dashboard and Mail Alerts
Section 3 : Image Processing and Intrusion Detection
So now we need to setup an image rather video processing program called ‘Motion’.
Motion is a highly configurable program that monitors video signals from many types of cameras. Set it up to monitor your security cameras, watch birds, check in on your pet, create timelapse videos and more.
- Create videos or save pictures of the activity
- Passthrough recording from many IP cameras
- View live stream of cameras
- Invoke scripts when activities occur
- Log activity into multiple types of databases
- Fully customizable masks for privacy or motion detection
- Full tls(https) support with authentication for webcontrol and streams
For more details on motion – https://motion-project.github.io/
So we will install this motion python module .If we install motion in our Pi then motion will detect any kind of movement happening in front of the Pi Camera. These movements will invoke the Pi Cam to start recording the video. The video will be recorded this the movement stops . So the use can record video if any body intrudes in the campus. This is fully automatic due to the use of motion module.
Installing and Setting Up Motion
#update pi
sudo apt-get update
sudo apt-get upgrade
#download
sudo apt-get install motion
#now edit this file with the following changes
sudo nano /etc/motion/motion.conf
#Now to set up motion according to our project we need to so edit the motion.conf in the following lines.
#################
daemon on
stream_localhost off
webcontrol_localhost off
ffmpeg_output_movies on
target_dir /var/lib/motion
##################
#local web browser streaming options
##################
stream_maxrate 100 #This will allow for real-time streaming but requires more bandwidth & resources
framerate 60 #This will allow for 60 frames to be captured per second #the higher this gets, the slower the video processing
width 640 #This changes the width of the image displayed
height 480 #This changes the height of the image displayed
##################
#emailing video settings in …/motion.conf
##################
#delete the ” ; ” in front of the line, the semicolon comments the line out
# This python code gets executed when any event ( in this case physical object movement like person movement) gets detected
on_event_start python /home/pi/background/motionalert.py %f
# This python code gets executed when the event ends ( eg. person goes out of camera frame)
on_movie_end python /home/pi/background/motionvid.py %f
#then change
sudo nano /etc/default/motion
#to start motion service as a daemon thread
start_motion_daemon=yes
#last, start the motion service
sudo service motion start
#you can change the command to “stop”, or “restart”
So now we have installed motion video processing module in Rpi . It will record the video of any movements ( like a person moving into the camera frame) happening in front of the pi camera.
We view the Live camera feed from our local browser using the following Link YOUR_PI_IP:8081 eg 192.168.1.107:8081.
This feed can be used by regular surveillance units.
Section 4 -Web Dashboard and Mail Alerts
Now to alert the user about the probable intrusion , will mail the recorded video to the concerned user pre-configured mail id.This mail will be trigger initially by motion program when any physical movements of objects is detected in front of the pi camera, the pi camera will also start recording the video . Once the movement stops and the video recording ends , the same video is also mailed to the user using motion program.
For emailing the alert and video following steps are to be followed
Email when motion is detected:
#start at home
cd ~
#create motion alert python script
sudo nano /home/pi/background/motionalert.py
#write
import smtplib
from datetime import datetime
from email.MIMEMultipart import MIMEMultipart
from email.MIMEText import MIMEText
fromaddr = “YOURADDRESS”
toaddr = “RECIEVINGADDRESS”
msg = MIMEMultipart()
msg[‘From’] = fromaddr
msg[‘To’] = toaddr
msg[‘Subject’] = “Motion Detected”
body = ‘A motion has been detected.nTime: %s’ % str(datetime.now())
msg.attach(MIMEText(body, ‘plain’))
server = smtplib.SMTP(‘smtp.gmail.com’, 587)
server.starttls()
server.login(fromaddr, “YOURPASSWORD”)
text = msg.as_string()
server.sendmail(fromaddr, toaddr, text)
server.quit()
Email Video of motion when video is saved:
#start at home
cd ~
#create motion video python script
sudo nano /home/pi/background/motionvid.py
import smtplib
from email.MIMEMultipart import MIMEMultipart
from email.MIMEText import MIMEText
from email.MIMEBase import MIMEBase
from email import encoders
fromaddr = “YOUR EMAIL”
toaddr = “EMAIL ADDRESS YOU SEND TO”
msg = MIMEMultipart()
msg[‘From’] = fromaddr
msg[‘To’] = toaddr
msg[‘Subject’] = “Motion Cam Activated”
body = “Video of Motion Detected”
msg.attach(MIMEText(body, ‘plain’))
import os
rootpath = ‘/var/lib/motion’
filelist = [os.path.join(rootpath, f) for f in os.listdir(rootpath)]
filelist = [f for f in filelist if os.path.isfile(f)]
newest = max(filelist, key=lambda x: os.stat(x).st_mtime)
filename = newest
import os
rootpath = ‘/var/lib/motion’
filelist = [os.path.join(rootpath, f) for f in os.listdir(rootpath)]
filelist = [f for f in filelist if os.path.isfile(f)]
newest = max(filelist, key=lambda x: os.stat(x).st_mtime)
attachment = open(newest, “rb”)
part = MIMEBase(‘application’, ‘octet-stream’)
part.set_payload((attachment).read())
encoders.encode_base64(part)
part.add_header(‘Content-Disposition’, “attachment; filename= %s” % filename)
msg.attach(part)
server = smtplib.SMTP(‘smtp.gmail.com’, 587)
server.starttls()
server.login(fromaddr, “YOUR PASSWORD”)
text = msg.as_string()
server.sendmail(fromaddr, toaddr, text)
server.quit()
How to access your Pi camera live feed from any Where in the world?Remote Survelliance?
Our Raspberry Pi’s local IP is not accessable from outside internet , so as to publicly ,securely access our Pi we need Ngrok
What is ngrok?
ngrok exposes local servers behind NATs and firewalls to the public internet over secure tunnels.
For more details read https://ngrok.com/product
So lets setup ngrok and access our camera feed from any part of the world
Ngrok Setup
sudo wget https://dl.ngrok.com/ngrok_2.0.19_linux_arm.zip
unzip ngrok_2.0.19_linux_arm.zip
Visit ngrok website go to:
https://dashboard.ngrok.com/user/login
and then click sign up to get an authtoken key. this token is necessary if you want your own custom domain doing an online SSH , after you manage to login you will get an authtoken key which a combination of a lot character.
You need to embed this token to your raspberry pi using:
./ngrok yourauthtoken
change the yourauthtoken with your own key that you get from ngrok website. You only need to this once for your raspberry pi.
now you can make your raspberry pi security cam system to be controlled online using
./ngrok 8081
This command will print some think like
ngrok by @inconshreveable
Tunnel Status                 online
Version                       2.0/2.0
Web Interface                 http://127.0.0.1:4040
Forwarding                    http://92832de0.ngrok.io -> localhost:81
Forwarding                    https://92832de0.ngrok.io -> localhost:81
Connnections                  ttl     opn     rt1     rt5     p50     p90
                              0       0       0.00    0.00    0.00    0.00
The portion highlighted in green is the global ip and port for accessing our raspberry picamera.
We can check our pi cam live feed by using these links from any browser .
Now we have a robust survelliance system to check live camera feed and have motion detection alerts . You can just make it work will your very own Rpi just under 50$.